


Rose Quartz has A LOT of hair. So if you're wanting to cosplay her, you'll probably need a wig. Cowbutt Crunchies Cosplay has a tutorial for how to make a huge and amazing Rose wig. Check out the steps, after the break!
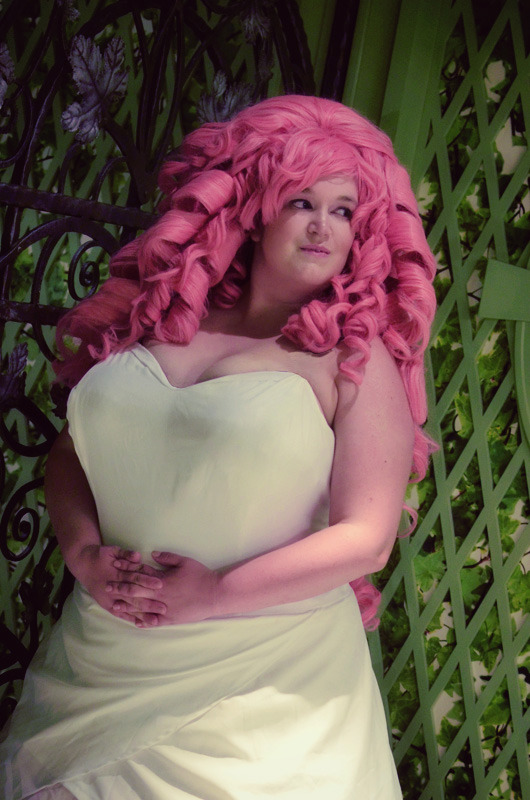
We’ve gotten a ton of questions about how I made Cjgren‘s giant Rose Quartz wig, so in this post I’ll be going over all of my steps in detail! There’s a lot of things I like about this wig but also a few steps that I’d do differently if I had to make it again. I’ll try to touch on all of those to help out any future Rose cosplayers who want to make their own behemoth wigs!
Materials needed:
- Four 40" long pink wigs
- Styrofoam block
- Pink felt
- 14 or 16 gauge wire
- Drill curl material such as heavy fusible interfacing or packing tape
- Curlers and/or curling iron
- Scissors
- Hot glue
- Tacky glue and/or tacky spray
- Got2B and/or hairspray
- Needle and thread
- Toupee clips and hairpins
Click the below cut to get started!
Part 1: The hair bump
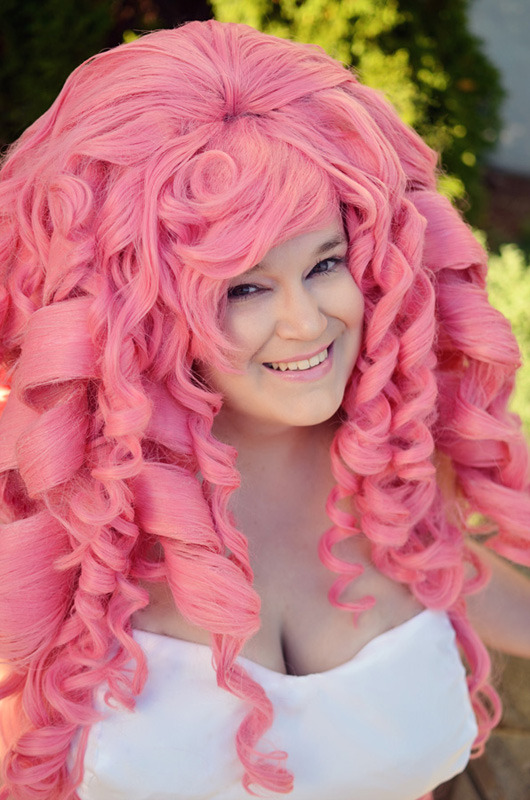
Rose’s hair flows back from the crown of her head. To get this huge volume up top without weighing it down with tons of hair, we’re going to instead build an “bump” understructure on the crown of the head out of styrofoam.
Before you start: separate your wigs. You will need one wig for your base, one wig to cover the hair bump, and 1-2 wigs for your giant drill curls, depending on how many curls you make. I used Kamo’s pink wigs from Amazon, but be warned - this color photographs REALLY differently depending on your lighting. It’s kind of bizarre.

1) Take your block of styrofoam and carve it down into a circular wedge shape. Don’t forget to round out the bottom so it fits comfortably on your head.
2) Hot glue the felt over the foam. This will change the color to pink but I also have an easier time gluing hair over felt.

3) Take one of your wigs and snip an inch or two of the netting on either side. This will make your cap less curved and easier to lay over the foam.
4) Draw a thick line of hot glue along the front-bottom edge of your foam. Add glue to the front underneath of the foam as well. Take your wig and arrange it over the foam so that the front edge of the wig and short bang area is glued to the bottom of the bump (and hidden from view), and the rest of the wig is seated on top of the bump. The cap will probably not cover the bump back but don’t worry - this will be hidden by the rest of the hair.
5) Add a little more hot glue to the top of the bump to glue down the rest of the wig netting. Try not to leave enormous globs or it may bleed through to the top hair.
6) Glue the entire bump to the top of a second wig. Make sure you place the base wig on your own head and mark the placement of the the bump first to double check that you’ve arranged it in the right spot. Once done, stretch the base wig over a wighead and then hot glue the bump directly to the base wig. For extra security, you can use a needle and thread to sew through the styrofoam and into the base wig netting.

Part 2: Curling
If you prefer using a flat iron or hot rollers to curl your wig into ringlets, save this step for last! Personally I have terrible luck with curling irons except for small, tight ringlets. To make bigger rolls, I prefer to use the hot water method, which should be done early on.
1) Curl your entire wig with rollers. Try not to over-pack a roller with hair or you may end up with some kinks where the clip pressed in.
2) Heat a large pot of water to just under boiling. Remove from the stove. Ideally, transfer the water to a bucket you don’t use for food.
3) Dunk your wig into the pot, making sure to get all of the curlers wet.
4) Remove the wig after a minute and allow to dry for a few days.
5) Once dry, I removed the curlers and hairsprayed them into place to get a better visual for where to add the larger drill curls. However, the problem with this is that you can easily snare your curls as you work on styling the rest of the wig. If possible, leave your curlers in while you work on the remainder of the wig, or just leave the upper layer of curls on the hair bump. This may help keep your curls clean.
Part 3: Drill curls
Rose’s huge curls are too large to make without extra support. To create these, I used the wire method to create large sausage curls. Traditionally this is done using packing tape sandwiched on either side of wire, with tacky glue to fix the hair down. I wanted to try something I thought the hair would better stick to, so I sandwiched two pieces of thick fusible interfacing between wire. This worked very well, BUT the curl ended up heavier than I would have liked. For lighter curls, stay with packing tape.
You may also wish to experiment with what type of glue works for you. Coating all of your hair in tacky glue is probably the most secure way to fix all layers of hair and dries to a very hard finish, but it is kind of messy and uses a lot of glue. Hot glue is fast and easy, but makes it hard to place hair because you can’t move it around, and looks bad if you allow it to show through the top layers. Tacky glue spray dries super fast and holds very strong on toplayer hair, but it only sticks semi-well to the interfacing, cannot be arranged after spraying, and gives a nasty white coat if you touch it too much before it dries completely. Got2B is the cleanest of all, but can be weak - you’re better off using this for the top layer of hair in conjunction with a stronger glue for the bottom layer. I highly recommend trying things out to decide what you like - I’d never made drill curls before this wig and it took a while before I got the hang of anything that worked well. I used a combination of hot glue, tacky spray for the inside, and got2B for the outside on my curls.
1) Cut a length of wire to the desired curl length.
2) If using interfacing, cut two identical pieces that resemble the shape of your curl, tapering them down toward the ends. If using tape, cut two pieces of tape.

3) Sandwich your tape or interfacing on either side of the wire so that it runs down the center of the sandwich. Iron the interfacing together. Once done, I found that curling the wire into a loose C shape greatly helped when twisting into the drill shape.
4) Begin with the inside of the curl. Add some hot glue or tacky glue to the top of the curl base. Cut a length of hair from one of your spare wigs and lay it over the glue. Add additional glue on top of the hair and mush it down so that all of the fiber has been glued. Allow to dry.
5) Using your glue of choice, begin adding glue along the curl base and then arrange your hair on top. Secure the top layer of hair using more tacky glue, got2b, or tacky spray. Whichever you use, make sure that you glue all layers of hair or you’ll be left with flyaways.

6) Continue gluing the base and top until you reach the end of the curl base. Leave some extra hair on the end.
7) Repeat the above process for the top of the curl base. I find that gluing the top if much easier, since gravity will help you lay the hair if you hold the curl upright.

8) Wait for your glue to dry. Once done, carefully twist your curl into a drill shape. You will probably get some hair that pops off or moves around but don’t worry - use got2B and a hairdryer, or tacky spray to fix this back into place.
9) Use a blow dryer or curling iron and hairspray/got2b to curl the hair that extends past your base.
10) Repeat for your desired number of curls. I made nine of these and used the fiber in two wigs.
For more detailed drill curl tips, try these two drill tutorials. I read a lot of how-tos before trying my own.

Part 4: Attaching the drills
1) Visually arrange where you want the curls to go on your wig. Again, I really recommend putting the wig on your head to double check before gluing things down.
2) Clip the base wig hair out of the way. Add a generous amount of hot glue to the top inch or so of your first curl and press it into the wig netting, holding it there until it is completely dry. I also added pins to allow it to dry even longer while I wasn’t holding it. Don’t get lazy and let go too early.

3) If possible, add some security by stitching the curl directly to the wig netting.
4) Repeat for the remainder of your curls and cry a little. For the front curls, try to position at least one on each side above another curl so that it rests on top of it. This will help the top curl stick out a little to create even more volume. Otherwise your curls may hang straight down and not give you much oomph. You can also try to bend the curl a little to your desired shape.
Part 5: Finishing
1) If your smaller curls are still in their rollers, remove them and hairspray the hair into place.
2) Use your curling iron to touch up or fix any snared hair. If you made a big fat mess like I did, you can also try carefully re-curling the hair with rollers.

3) Sweep the bangs to one side. Blowdry to set the hair into the new shape and then hairspray. If desired, curl a few pieces of the bangs by hand, and add heat/hairspray.

4) Your wig is going to be pretty back heavy, so be sure to add some clips to keep it in place! Toupee clips are easy to add and great for keeping your wig from sliding backward. I sewed four of these in. I also highly recommend using hairpins to distribute more of the weight and keep it on your head. Check out Sadnesssucubus’s tutorial on how to do this. Finally, if you are worried about the weight, do not add curls to the very back of the wig. Less curls will help keep it more balanced.

Twitter: Emerald


